What Is an H1 Tag?
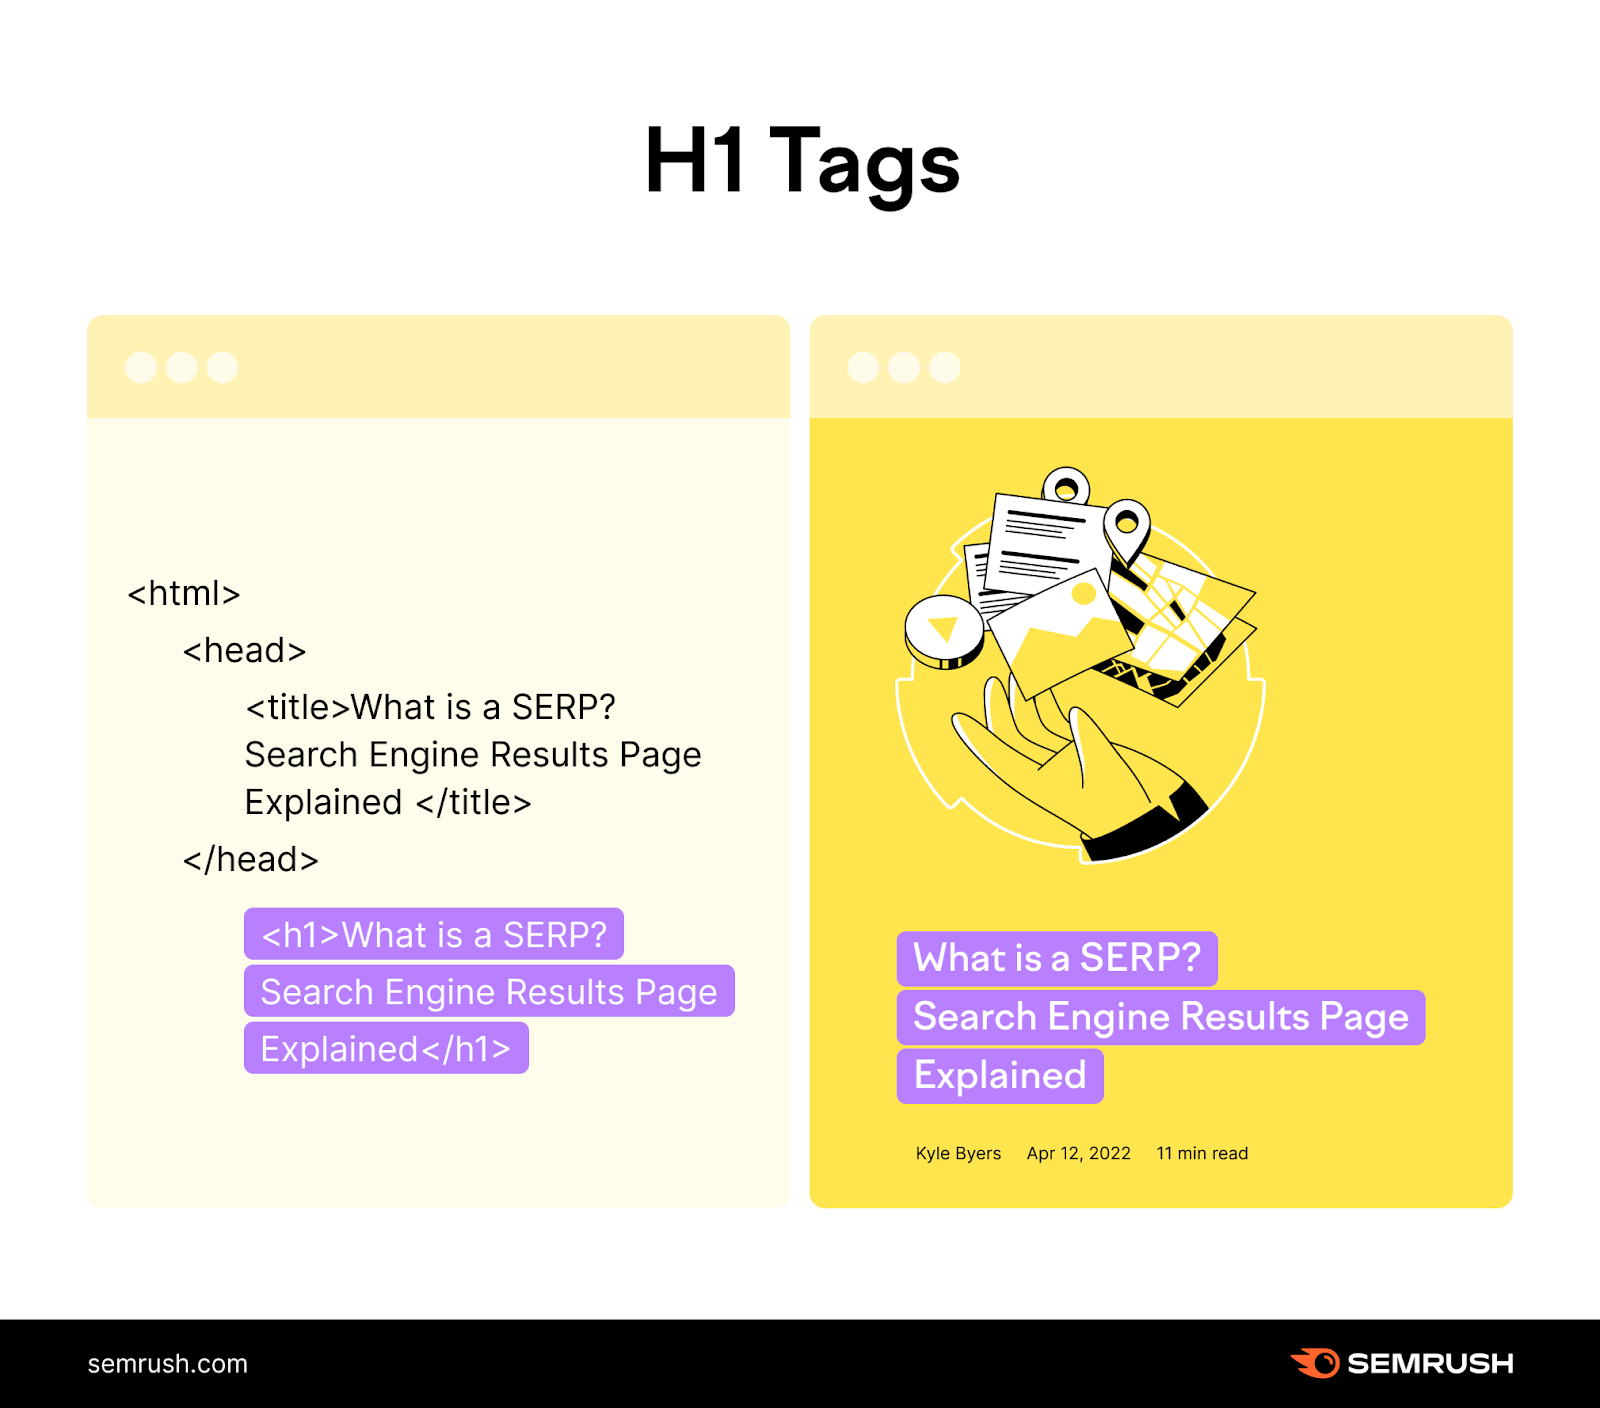
An H1 tag is the HTML used to create the main title on a webpage and helps indicate the page’s primary topic to visitors and search engines. It contains an opening <h1> tag, the title text, and a closing </h1> tag.
Here’s an example of an H1 tag in HTML and on the live page:
H1 Tag Examples
To give you a better idea of what an HTML H1 tag looks like in practice, let’s see examples from different websites.
The H1 tag on this Semrush Academy course is “SEO Principles: An Essential Guide for Beginners.” It’s concise, descriptive, and compelling.

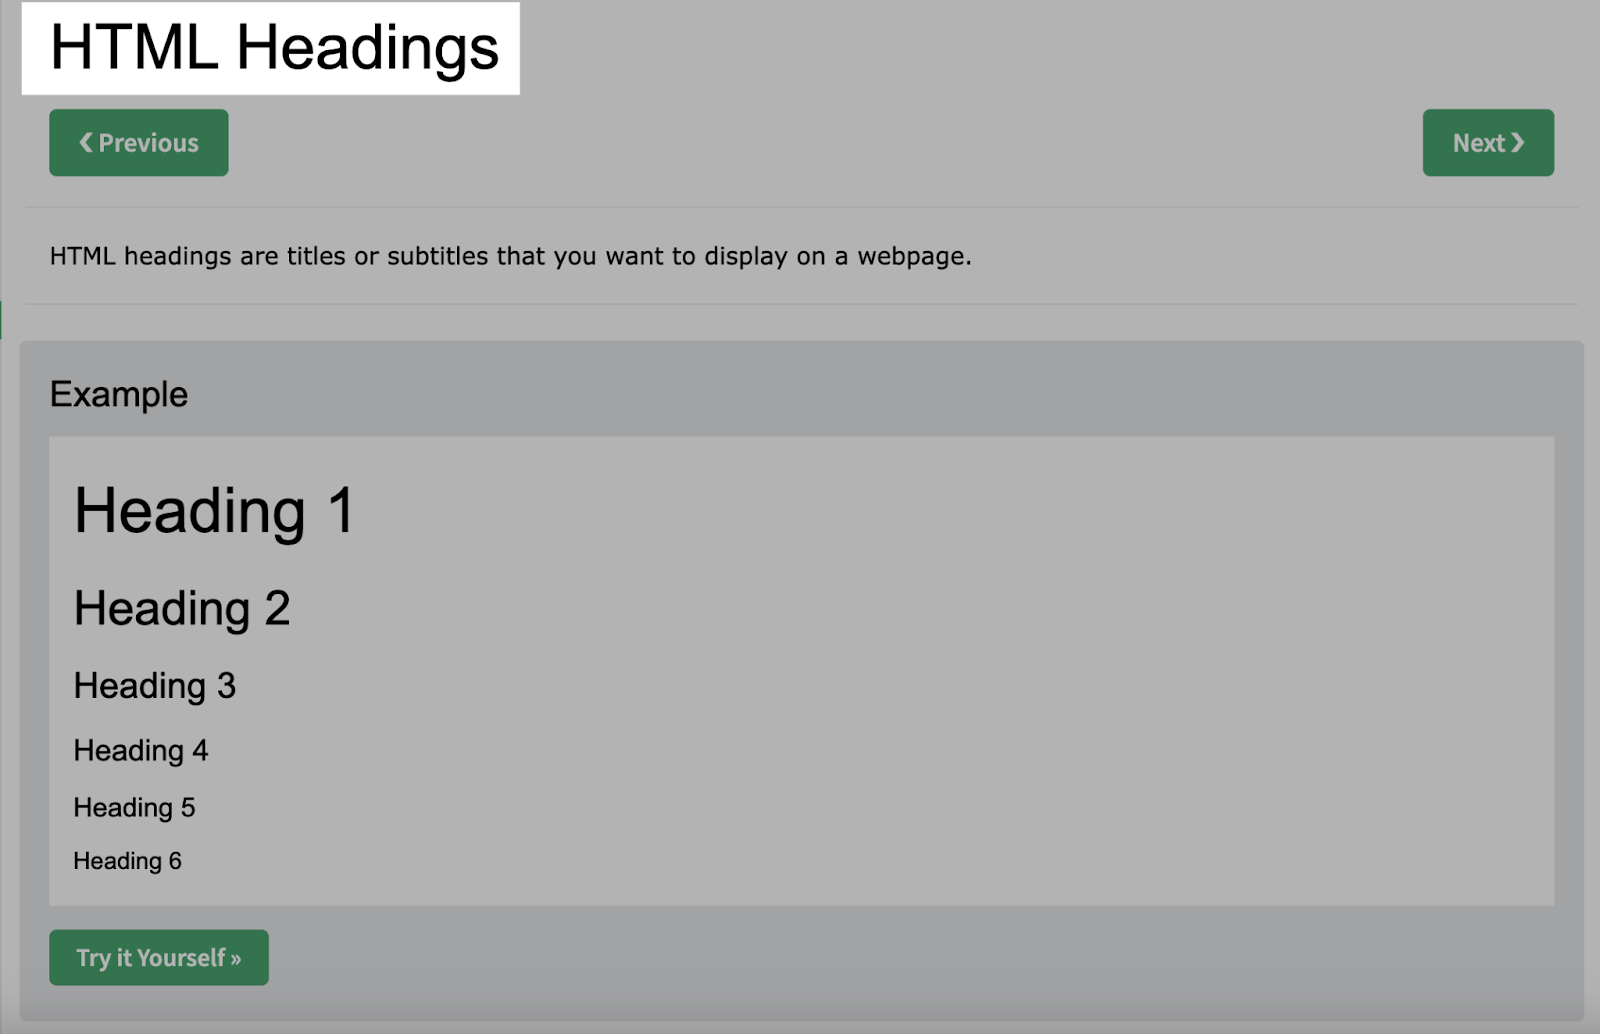
The H1 tag on W3Schools’ tutorial about HTML headings is “HTML Headings.” It’s simple, accurate, and matches the title of the page.
The H1 tag on this TechCrunch article is “We tested Google’s Gemini chatbot—here’s how it performed.” It’s intriguing and tells the reader exactly what they’ll find.

How to Check H1 Tags on a Webpage
It’s easy to look into the H1 tags on your own (or any other) webpages without needing special skills.
Here are some of the most common ways:
View the Page’s Source Code
Right-click anywhere on a page and select “View Page Source” or “Show Page Source” from the menu.
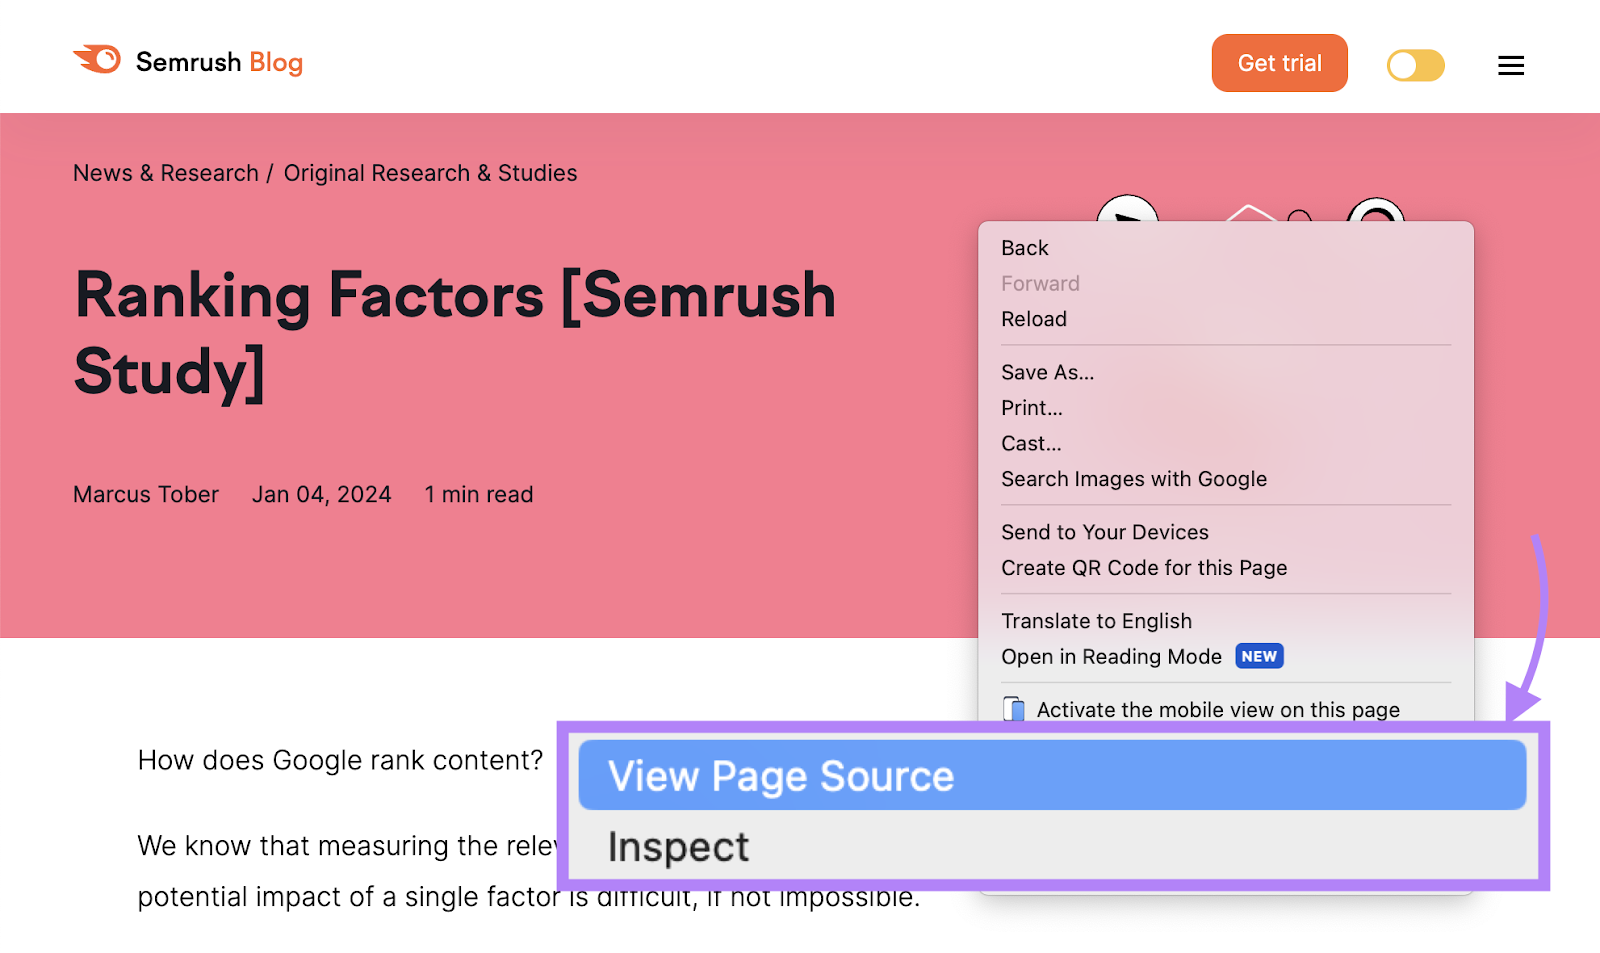
This will open a new tab with the page’s source code.
Now, you can manually look for the <h1> tag.
Or use the “Command + F” shortcut on Mac or “Ctrl + F” on PC and type “h1.”

Use a Browser Extension
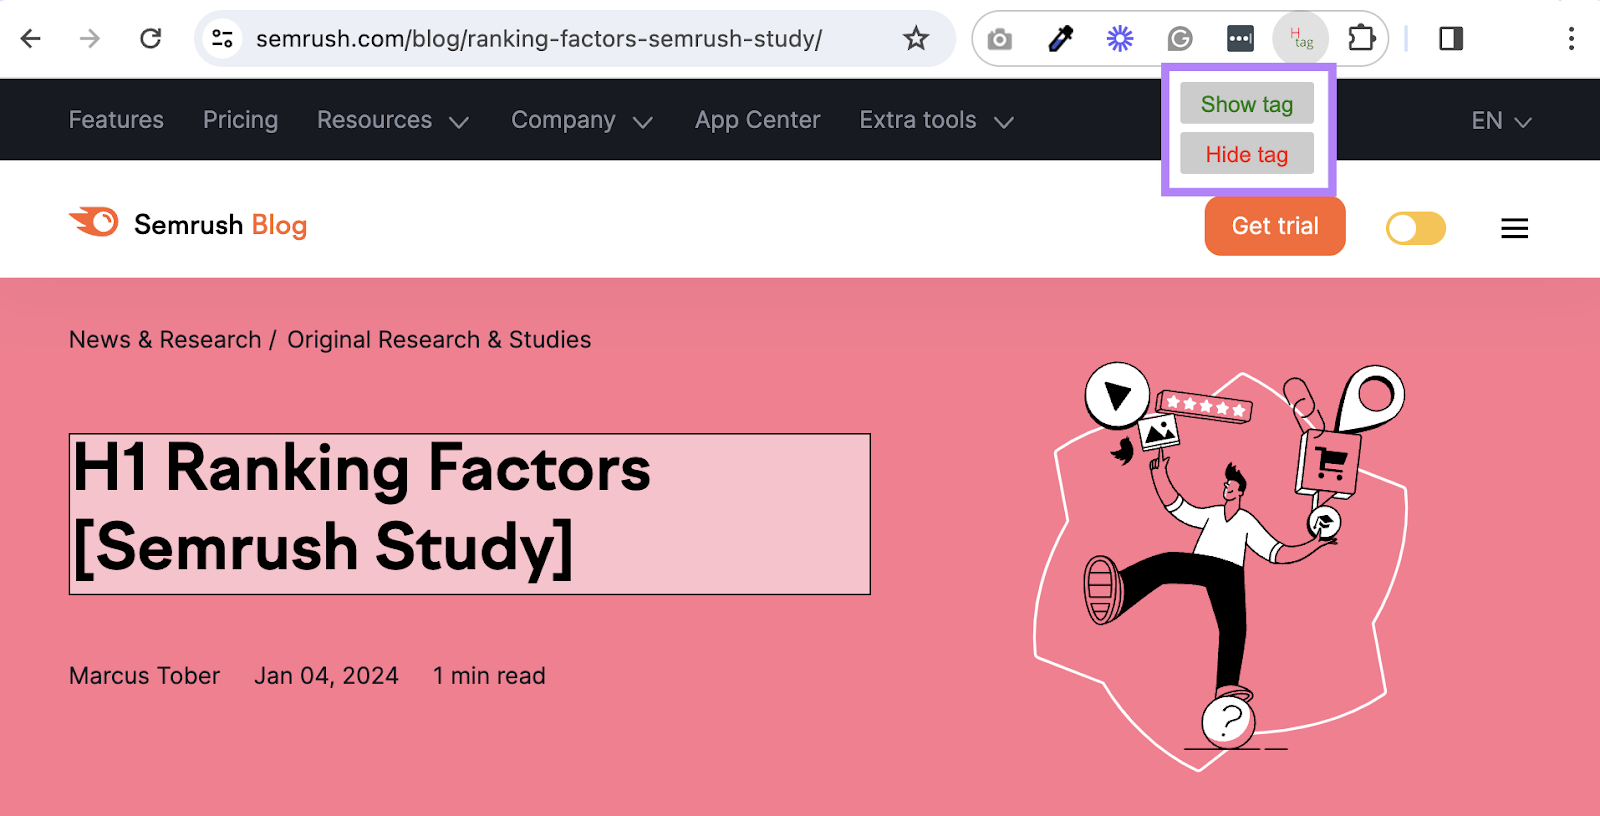
You can install a browser extension that will highlight the H1 tags on any webpage you visit.
For example, you can use the H-tag Chrome extension. Which will highlight all the <h> tags on a page.
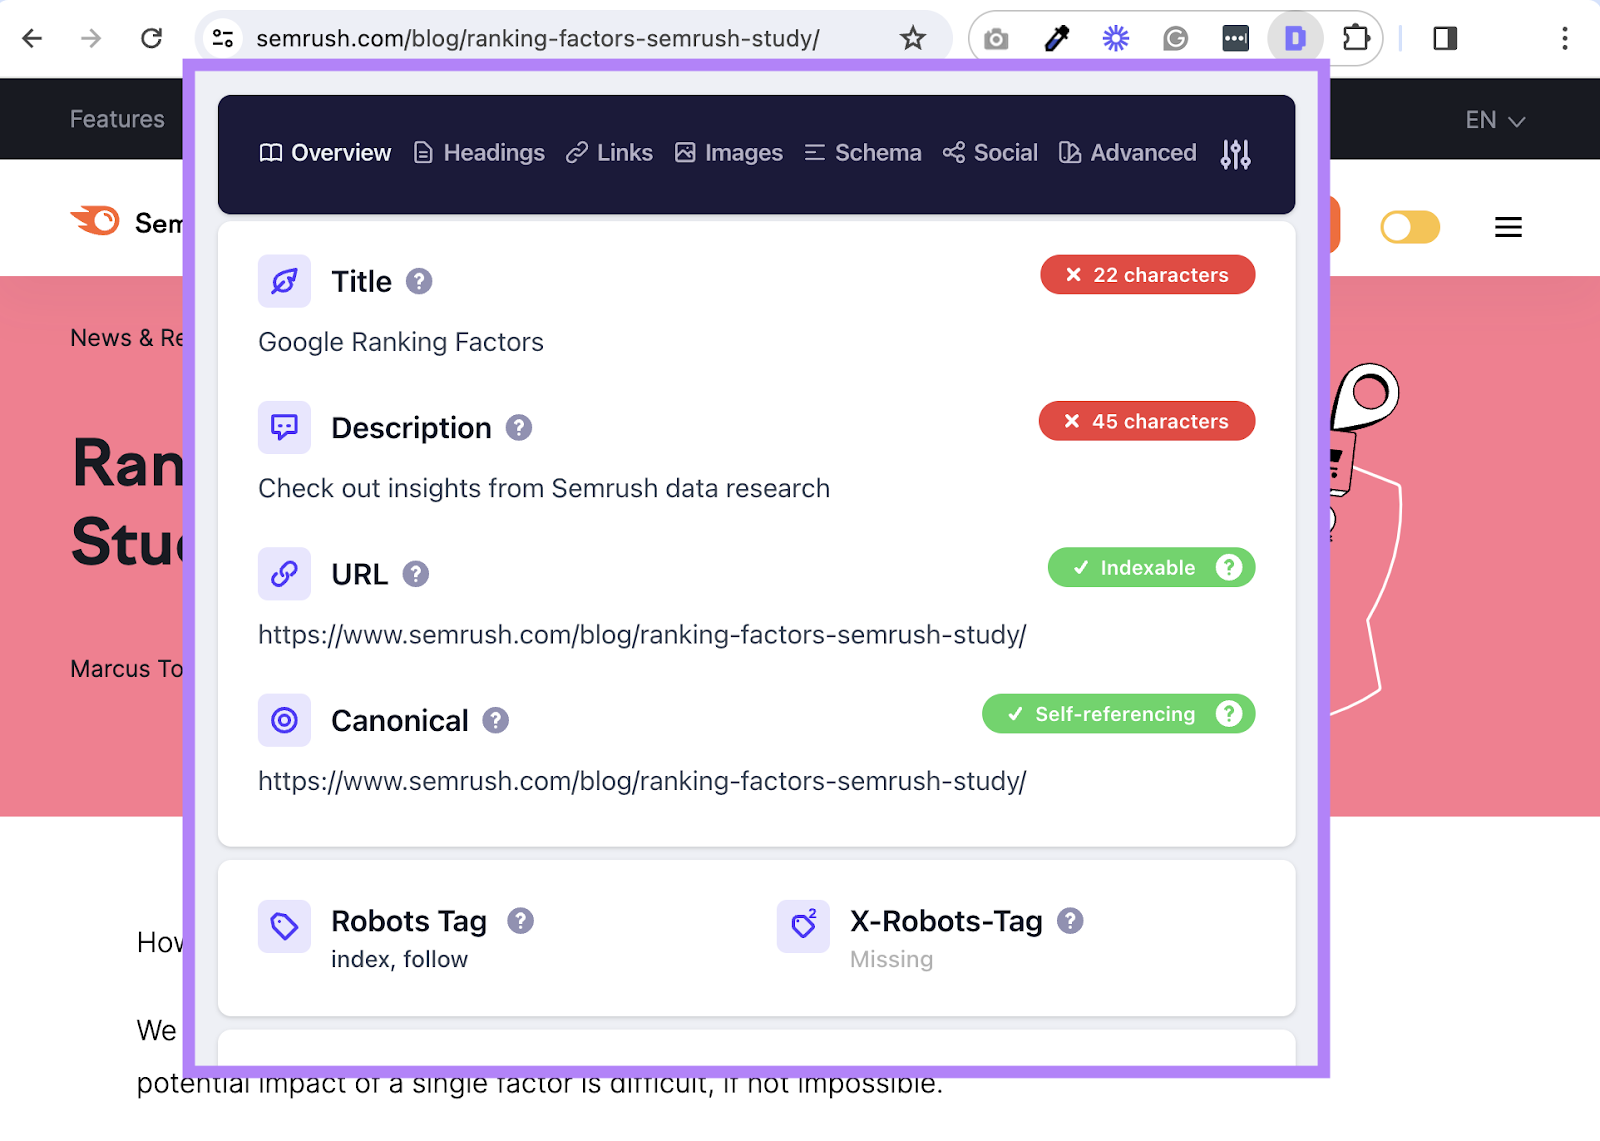
Other, more complex extensions like Detailed SEO Extension show tons of SEO-related insights such as:
- Title tags (HTML that specifies webpage titles)
- Meta descriptions (HTML that provides page descriptions)
- Meta robots tags (HTML that tells search engines how to crawl, index, and display a page’s content)
- <h> tags
And more.
Use a Website Audit Tool
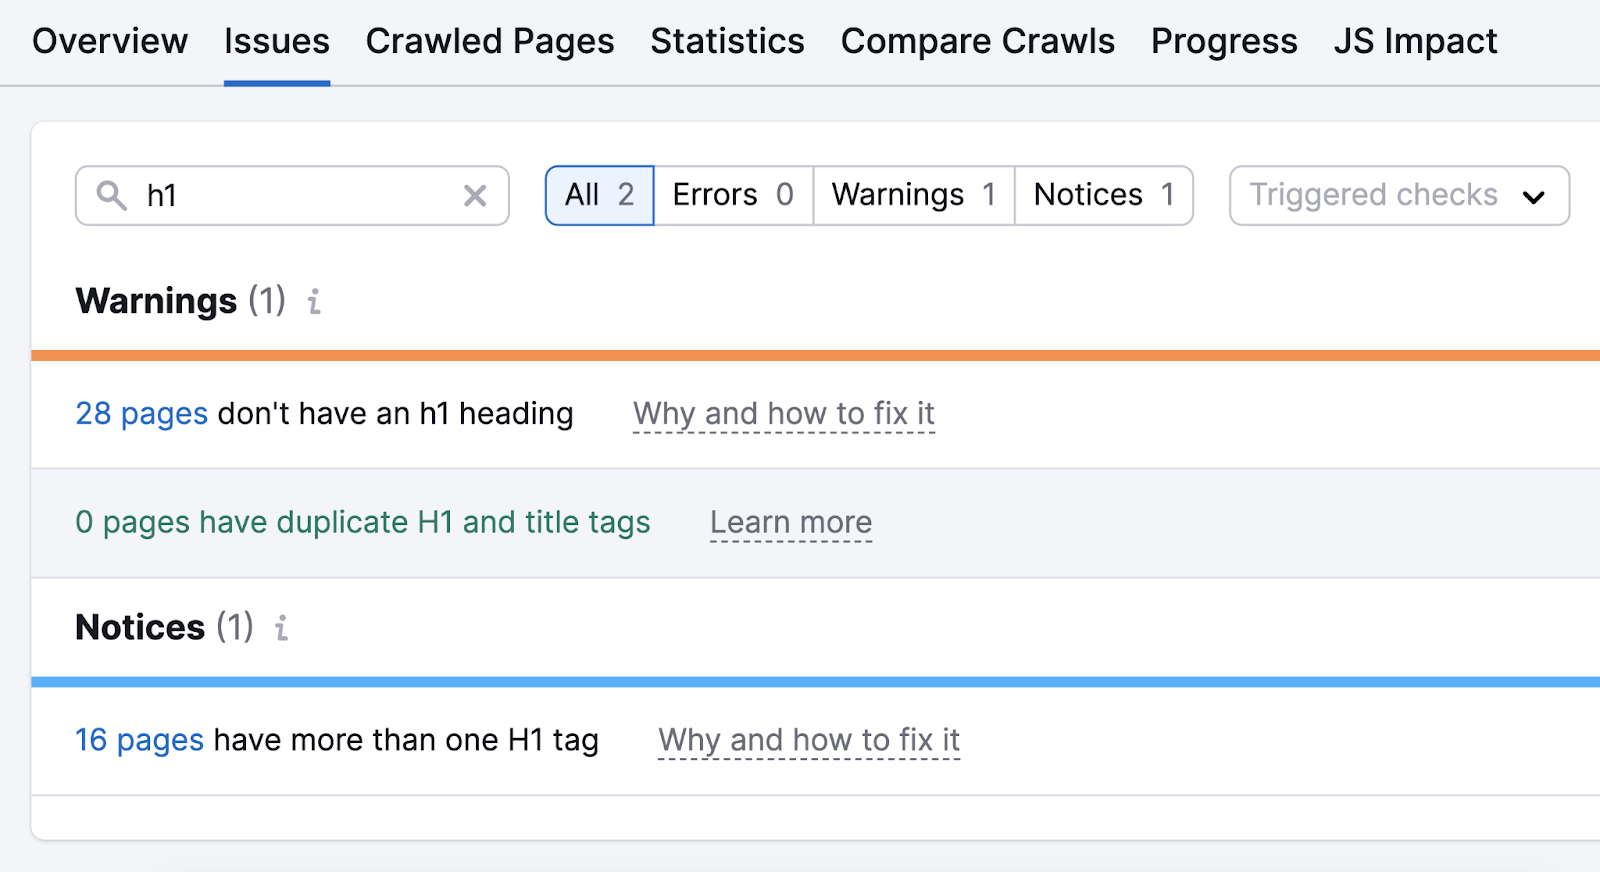
You can use a website audit tool that scans your website to identify any issues with your H1 tags. Such as missing, duplicate, or empty tags.
For example, Site Audit gives you information about your H1 tags as part of a comprehensive report on your website’s health and performance.
Why Are H1 Tags Important for SEO?
H1 tags aren’t a confirmed ranking factor. But they’re still important for SEO.
Here are the top three reasons why:
1. H1s Help Search Engines Understand Content
Search engines look at your H1s to learn about your pages and their content.
The more descriptive your H1, the better.
The H1 in this blog post from Chewy is a great example of a descriptive H1.
It tells search engines exactly what they’ll find: The best coffee shops with cats in the United States. To ensure they have an easier time understanding what’s on the page.

2. H1s Improve the User Experience
H1 tags improve the user experience (UX) by allowing readers to learn what your page is about at a glance. Especially when you consider most websites display the H1 as the largest text on the page.
And improving UX is fundamental. Google has emphasized it contributes to better rankings.
Not to mention:
A quick browse of headings can show readers what they’ll learn before they dig in. That way, they can pre-assess your content’s value.
If you’ve done a good job, your H1 will provide hierarchy and reassure visitors that you have the information they’re looking for.
Consider this image:
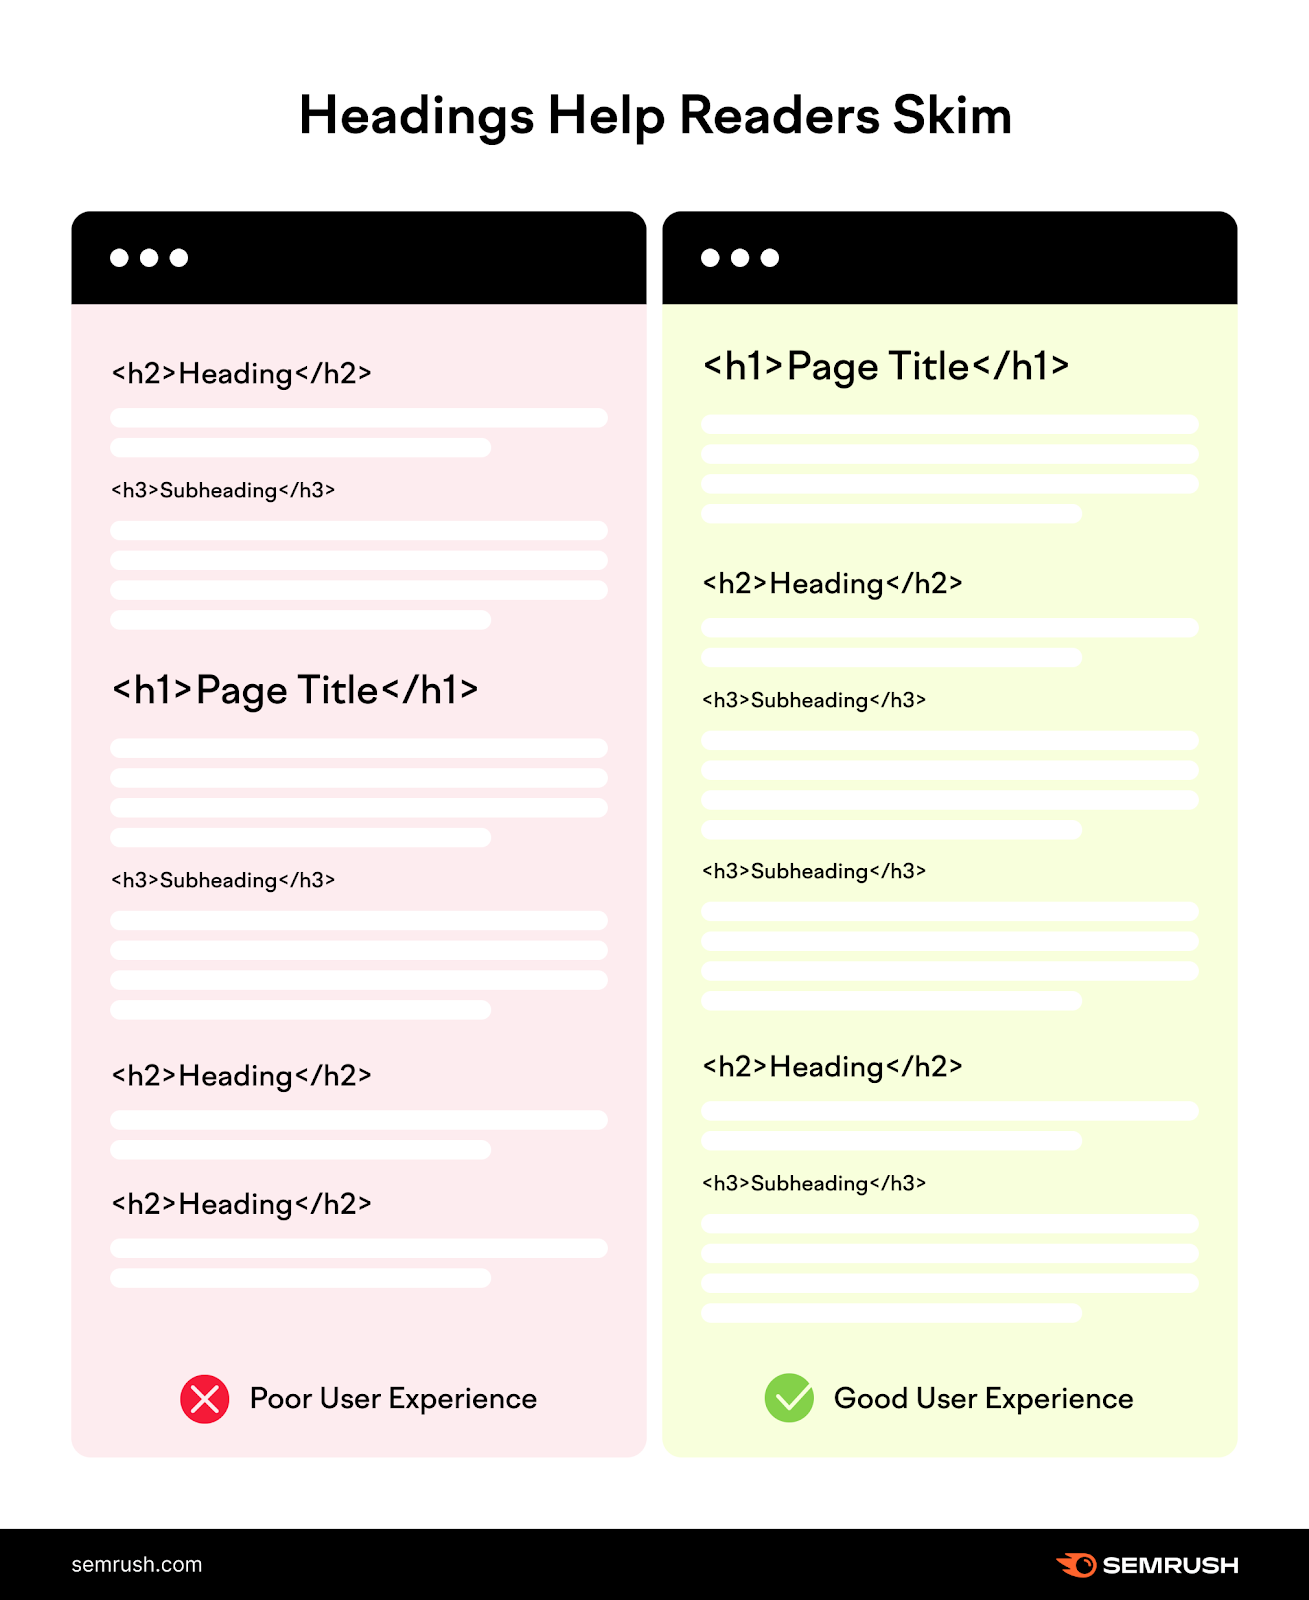
The example on the left has no clear structure and order. It’s really hard to tell what the content’s about.
The example on the right shows the H1 as the most prominent heading on the page, then H2, then H3, etc.
It’s easy to skim, follow, and understand.
3. H1s Improve Accessibility
H1 tags (and other headings in general) can help those who use screen readers understand the page’s content.
Screen readers are programs thatcommunicate computer text with a speech synthesizer or Braille display.
Here’s an example of how the headings in The Penn State University’s accessibility guidelines appear on a screen reader:
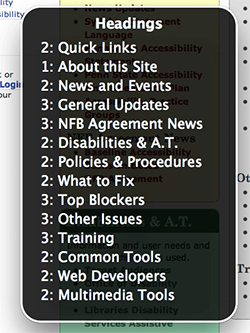
Image Source: The Penn State University
Quickly improve your site’s accessibility by crafting descriptive H1 tags and keeping an organized heading structure.
How to Add H1 Tags to Your Blog Pages
Adding an H1 tag to articles in most website content management systems (CMSs) is easy. In fact, many CMSs have a placeholder for your article title that’s automatically formatted to be your H1.
That said, here’s how to change your H1 tag using WordPress, Squarespace, and Wix.
Adding an H1 Tag in WordPress
Most WordPress themes are coded so the post title is the H1.
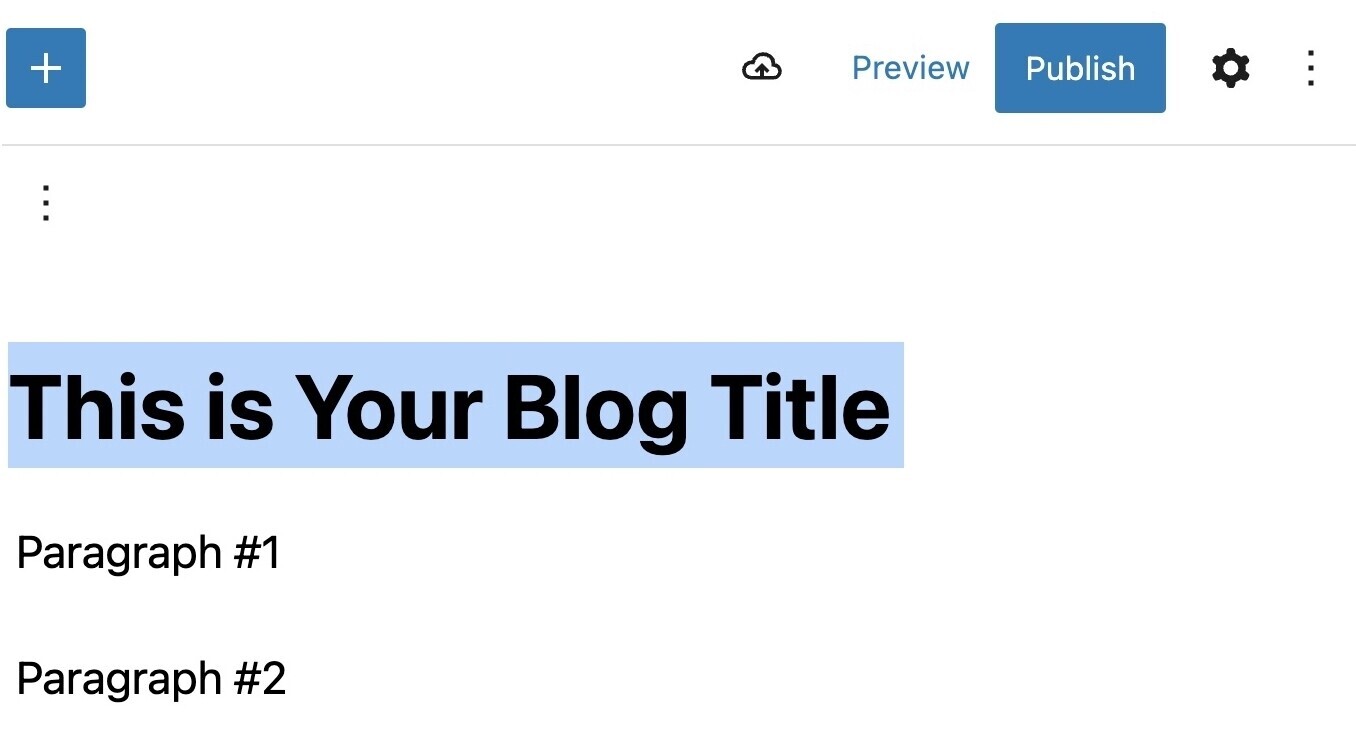
To change this (or any other) heading, click on or highlight the text you want to reformat. A toolbar should appear above your selected block.
Like this:
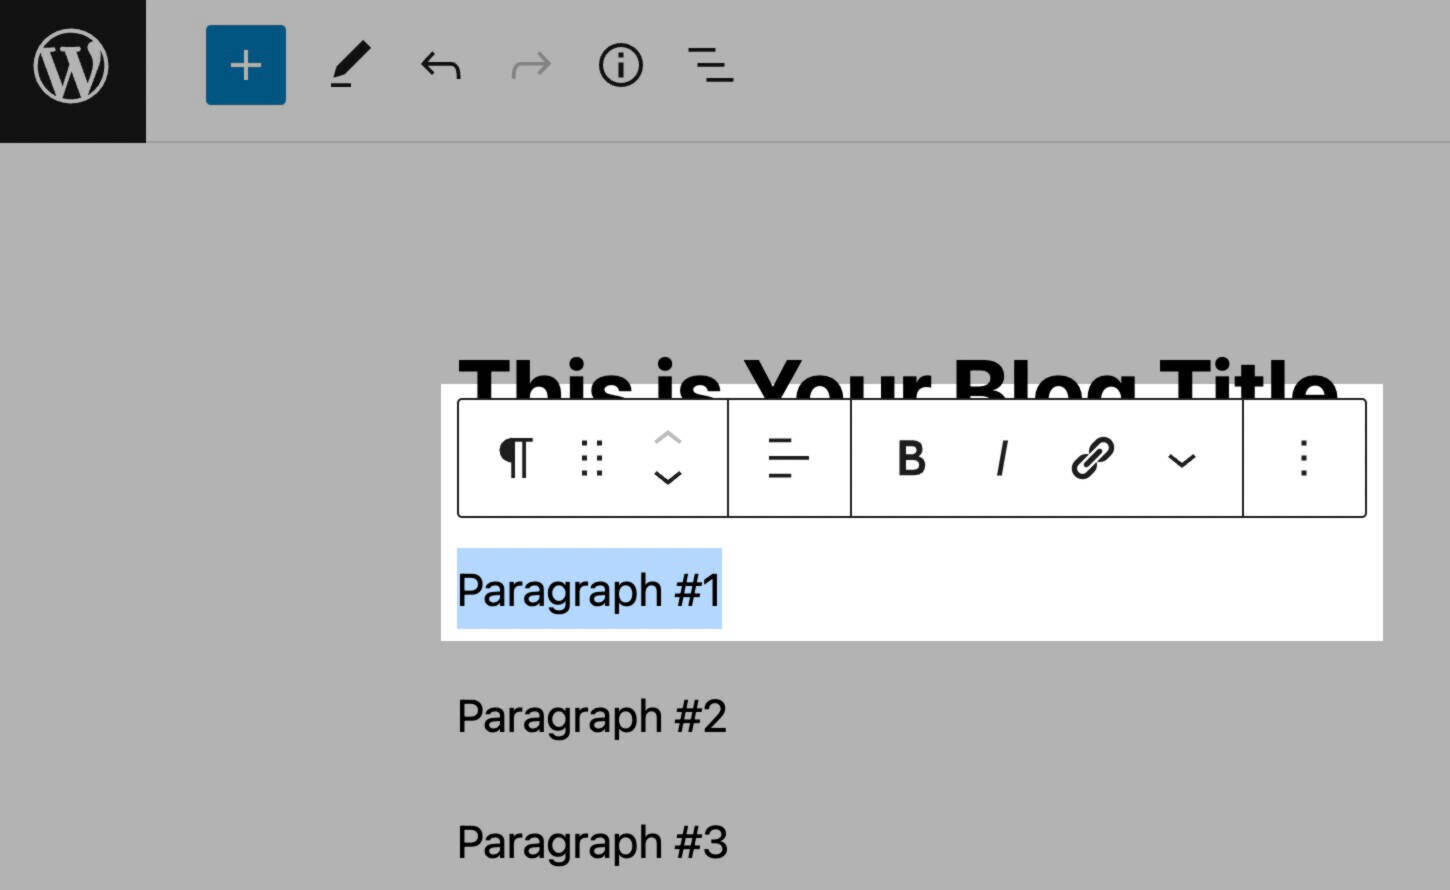
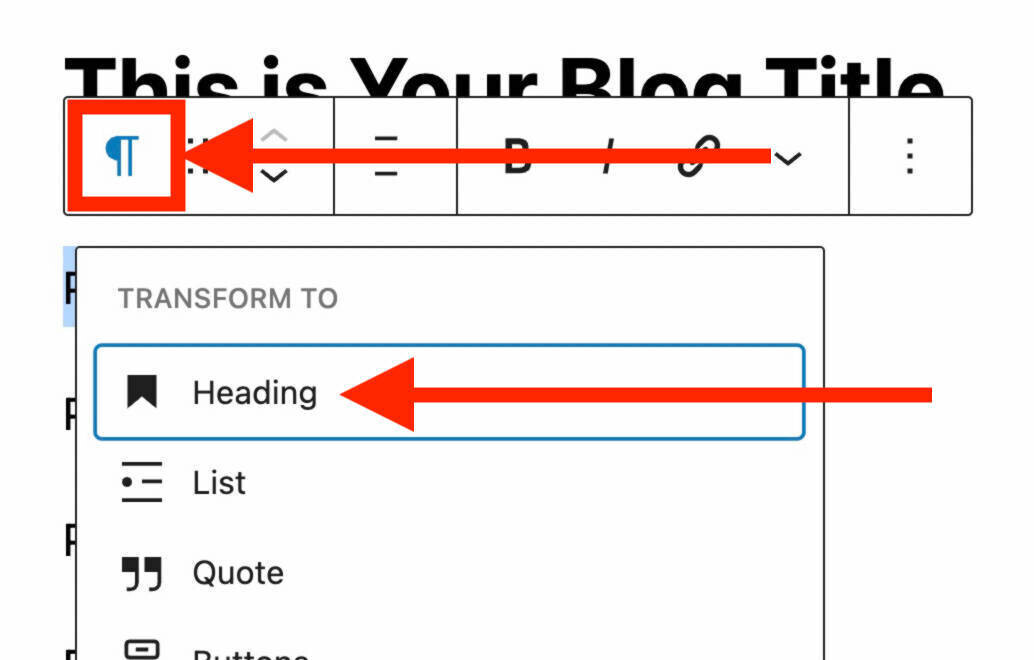
Click on the paragraph symbol found on the left-hand side of that toolbar.
Then, select “Heading.”
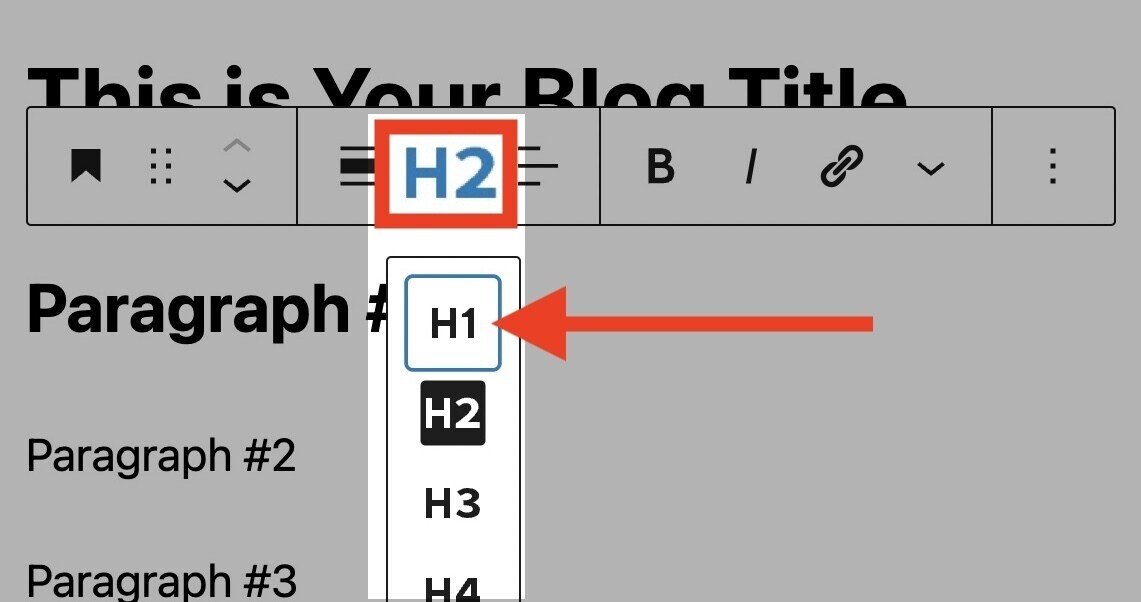
Change your heading tag to H1 by selecting “H1.”
You’re all set.
Adding an H1 Tag in Squarespace
Adding an H1 to blog posts in Squarespace is as simple as filling out the “post title” field in most cases.
If you want to change the H1 tag for a page, start by selecting the text you want to change into an H1.
Then, click on the formatting button on the left-hand side of your toolbar.
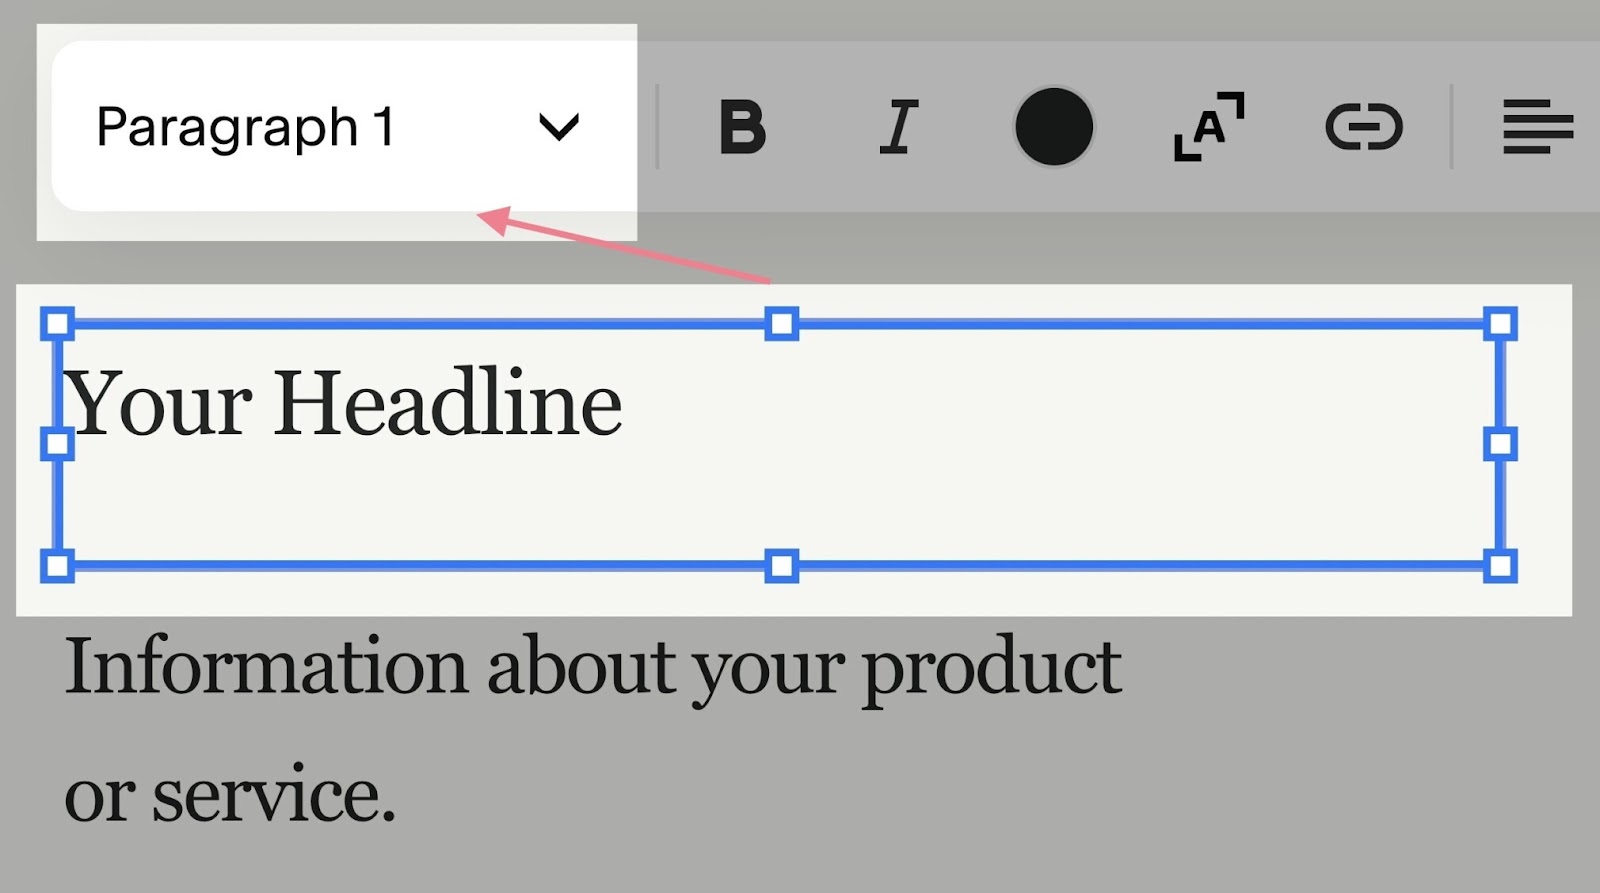
And select “Heading 1.”
Like this:
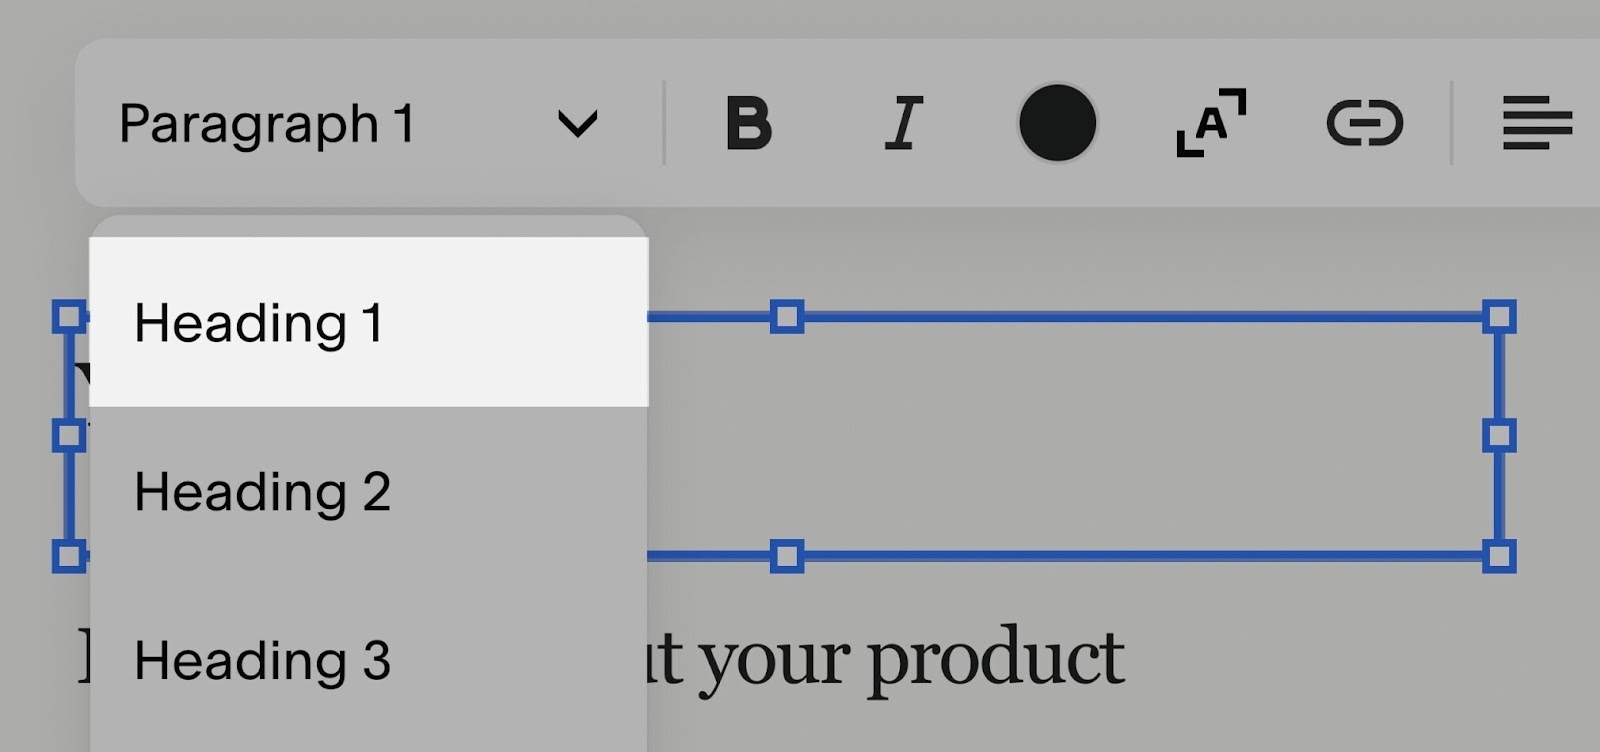
And you’re done!
Adding an H1 Tag in Wix
Wix also automatically makes your blog post title the H1 tag.
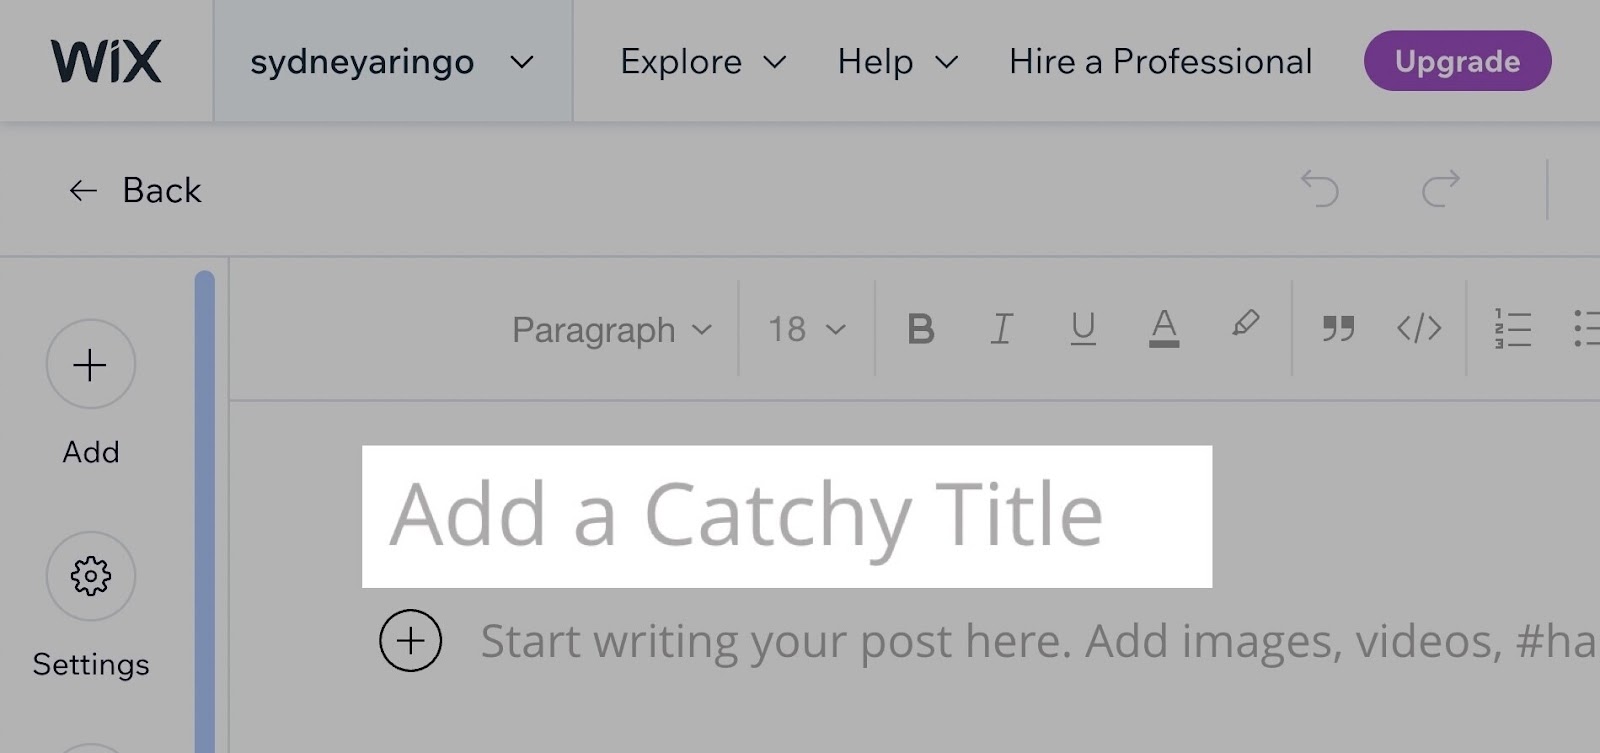
But unlike the other two CMSs on this list, the H1 tag is only an option for the post title. Meaning you can’t change any other subheading to be an H1.
H1 Tag Best Practices
Here are six H1 tag best practices you can follow to improve your SEO.
1. Use a Single H1 Per Page
Using just one H1 creates hierarchy and gives your page a more logical structure.
It makes it easy for readers (and those using screen readers) to skim and understand what your page is about.
The H1 is for the headline conveying the main topic. The H2s are for important subheadings. The H3s are for subheadings that support those. And so on:
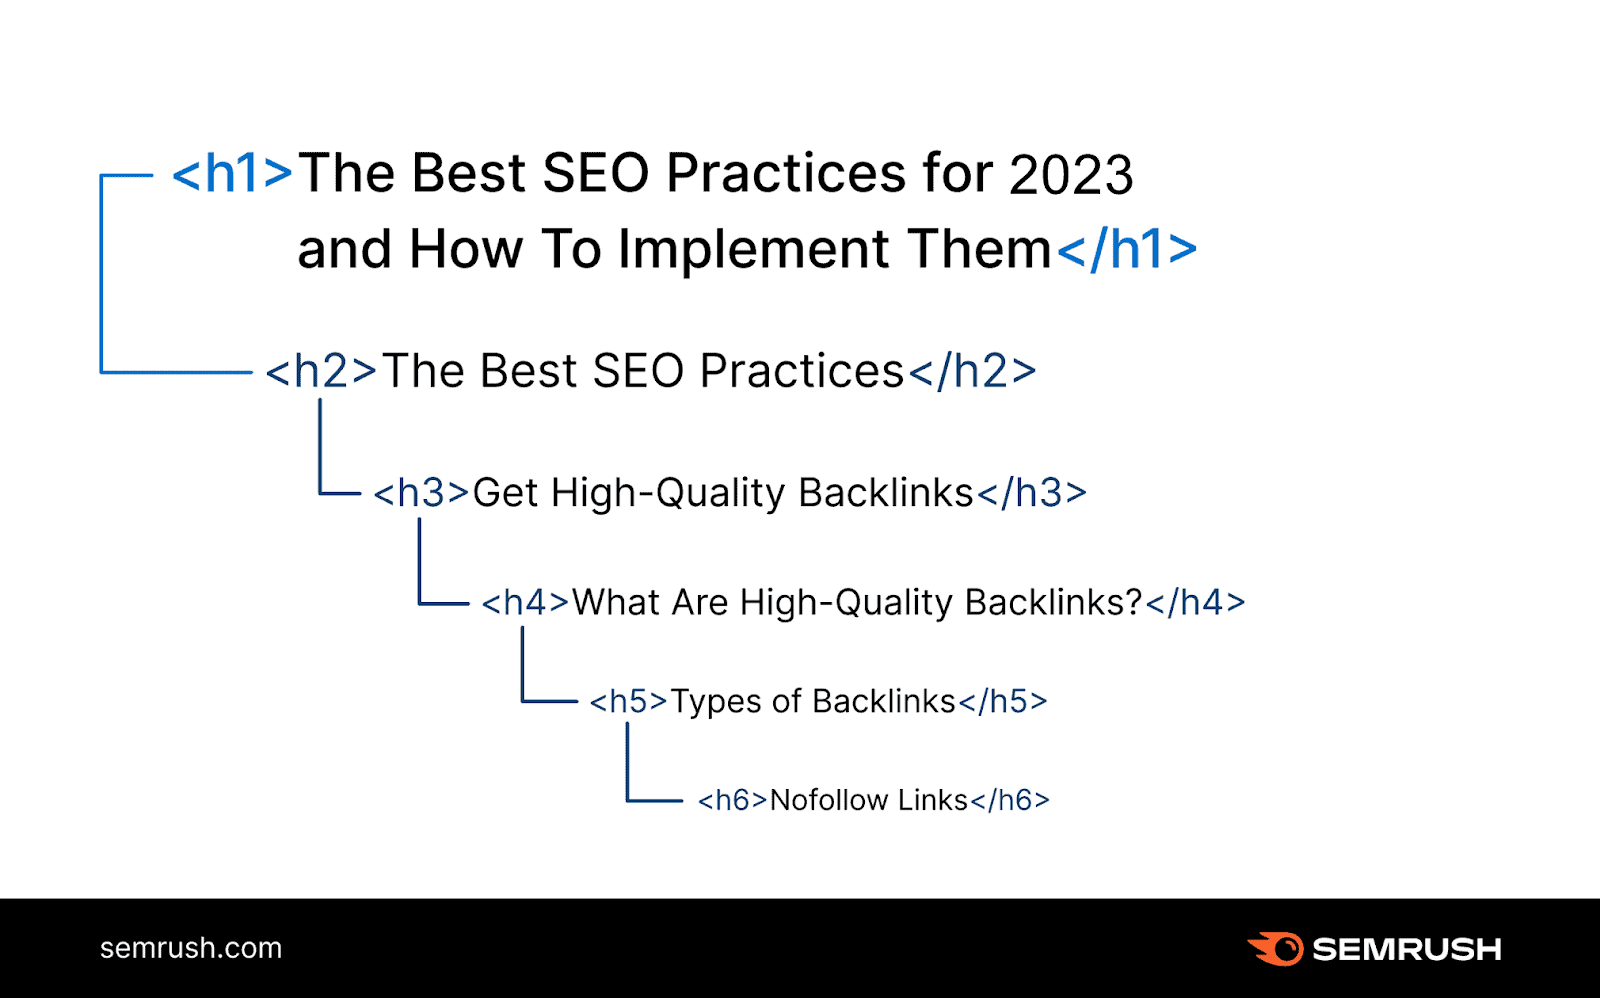
So, how many H1 tags per page?
Each page should have only one main topic. And that should be your only H1.
2. Make Sure Every Important Page Has an H1
Considering that an H1 tag is the most important heading, every important page should have one.
Which pages are considered important? That’s up to you. But a good place to start is with any page you want to rank on Google.
To find pages with missing or empty H1s:
- Go to Site Audit
- Enter your homepage URL and click “Start Audit”
- Click on the “Issues” tab
- Type “h1” in the search bar
- Click on the warning for pages that don’t have an H1
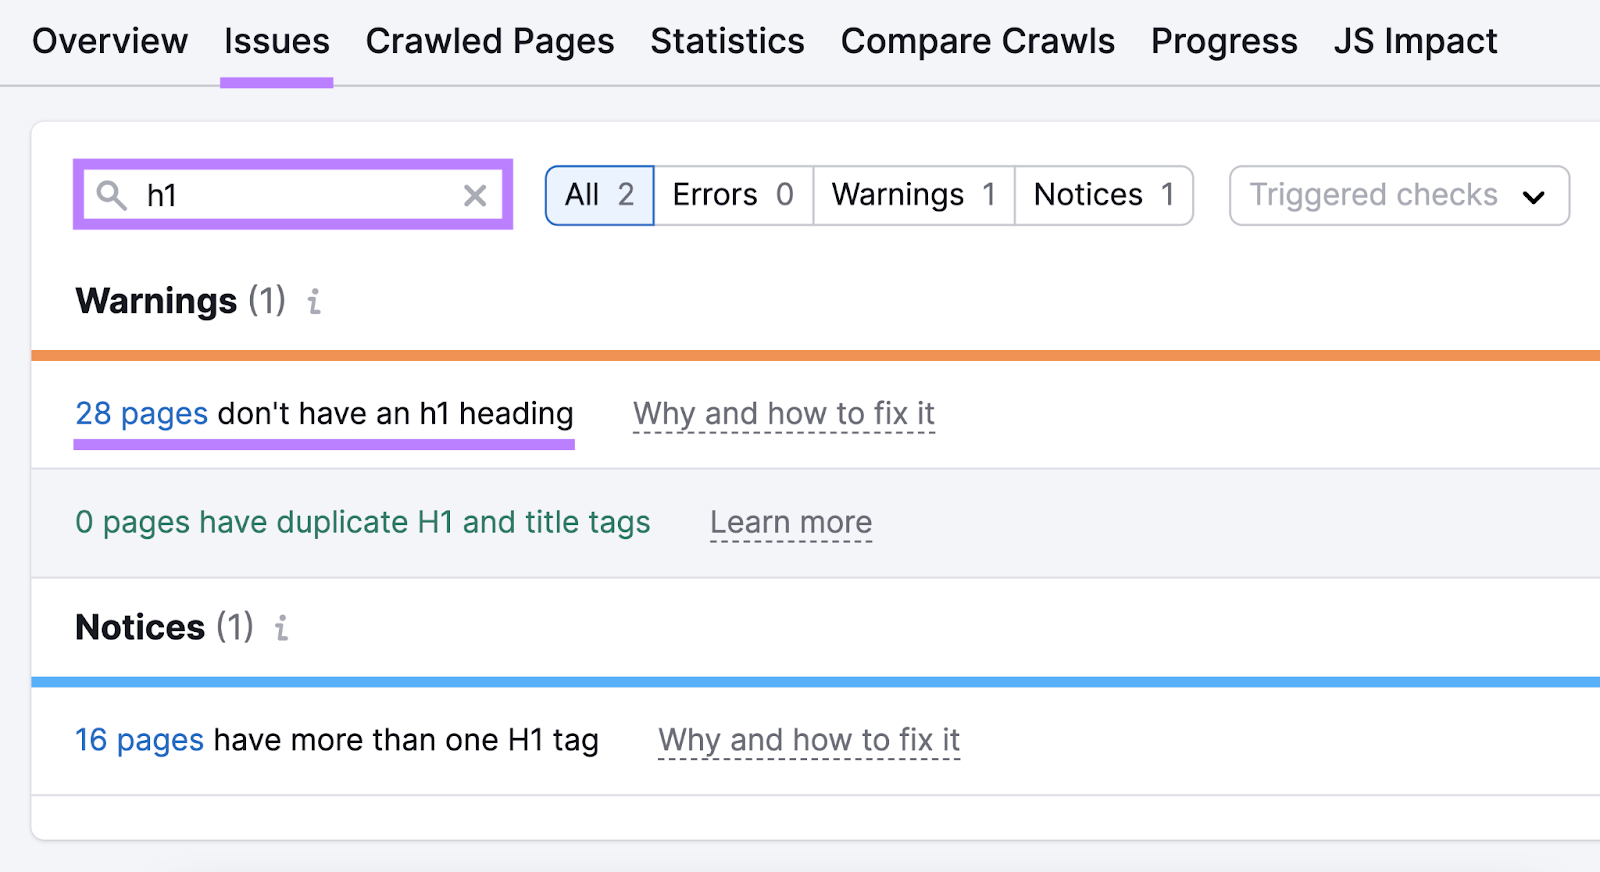
You’ll then see a list of affected pages. Which you can address by adding an H1 to each.
3. Include Your Target Keyword
Along with your title tag, Google scans content like your H1 to determine whether it’s relevant to a searcher’s query.
In other words:
A page with an H1 that mentions the search term is likely to rank better for that query than a page with an H1 that doesn’t.
We do this for all our blog posts.
Below, you can see how we included the keywords “title tags” and “alt text” in two different blog post H1s:

4. Keep H1 Tags Under 60 Characters
The clearer and more concise you make your writing, the better. It’s no different for H1 tags or other headings.
The best practice is to keep it between 50 and 60 characters—just like your title tags.
Why?
Many CMSs use the same copy for your H1 and title tag. Plus, Google occasionally switches title tags for H1 tags. And you don’t want Google to truncate it in the search results like this:

So, there’s no technical limit to the length of an H1 tag. But your best bet is to keep it under 60 characters.
5. Match Your H1s to Your Title Tags for Article Pages
A common SEO mistake is to confuse the title tags added in the <head> section of your code with H1 tags. Because both the title tag and H1 tag describe what a page is about.
The main difference is where they appear.
Title tags appear at the top of the browser tab. And may appear on search engine results pages (SERPs). Other than that, they’re not visible on the webpage.
Here’s an example of a title tag in a browser tab and in a SERP:

H1 tags are what users see on the page, often in large text. They usually don’t appear on SERPs if they differ from the title tag.
Here’s an H1 for one of our blog posts:

Google recommends matching your H1 tags to your title tags to prevent inaccurate article titles from showing up in search results.
If they are different, they should be very similar.
Like this:

Users will feel deceived if they land on your page and see a completely different (and unrelated) H1. You don't want that.
6. Optimize Your H1 to Satisfy Search Intent
Search intent is a user’s primary objective when searching for something.
Your H1 should immediately tell the reader that you’re going to satisfy their search intent.
In other words:
Your content is going to give them what they want.
Satisfying intent is important because it’s Google’s main goal. Which, makes it a primary goal for you if you want better rankings.
To determine the search intent for a keyword, type it into Google and analyze what comes up.
For example, the top results for “content marketing” focus on explaining what content marketing is:

None of those articles are too in depth. They also aren’t selling anything. That tells us the search intent is informational, with articles written for people who want to learn something.
This means we need to write an H1 (and accompanying post) that satisfies that informational search intent.
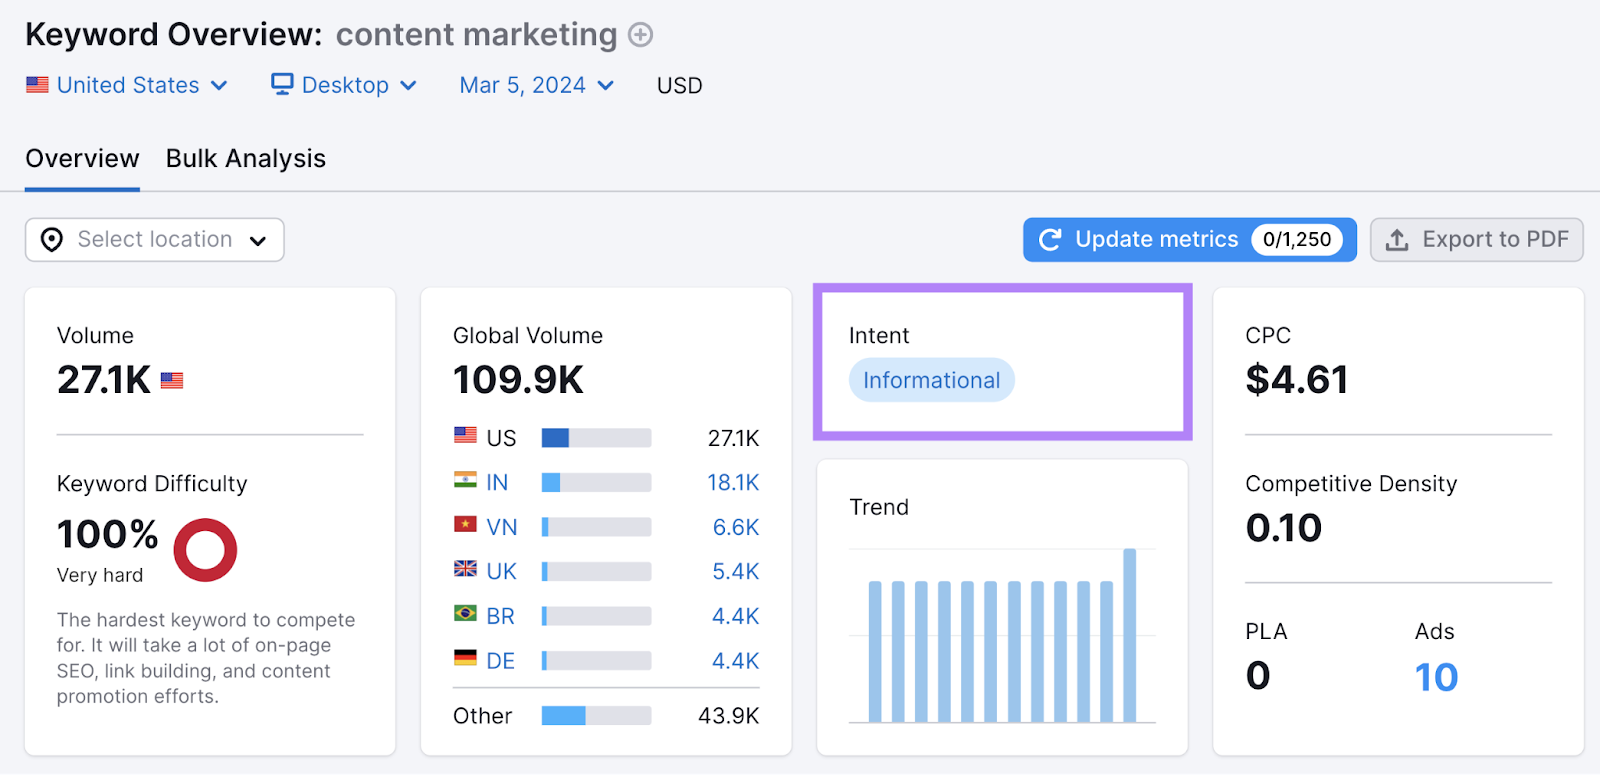
An even quicker way to determine search intent is with Keyword Overview.
Type in your keyword and click “Search.”
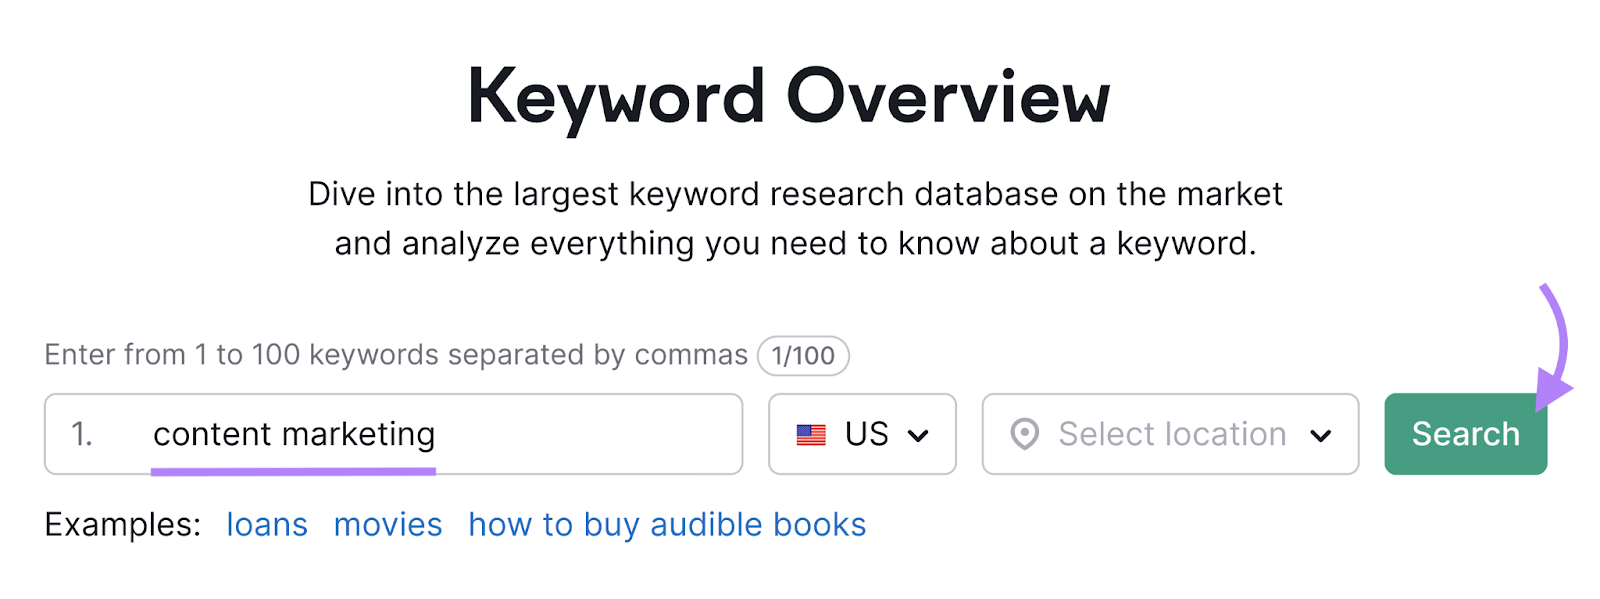
This will pull up information about your chosen keyword, including its intent.
How to Run an H1 Tag Audit
To check your website for any H1 tag errors, run an audit.
Open Site Audit. Then, paste in your domain name and click “Start Audit.”

The tool will show a dashboard with your site’s overall health.
Click on the “Issues” tab to see the list of problems.
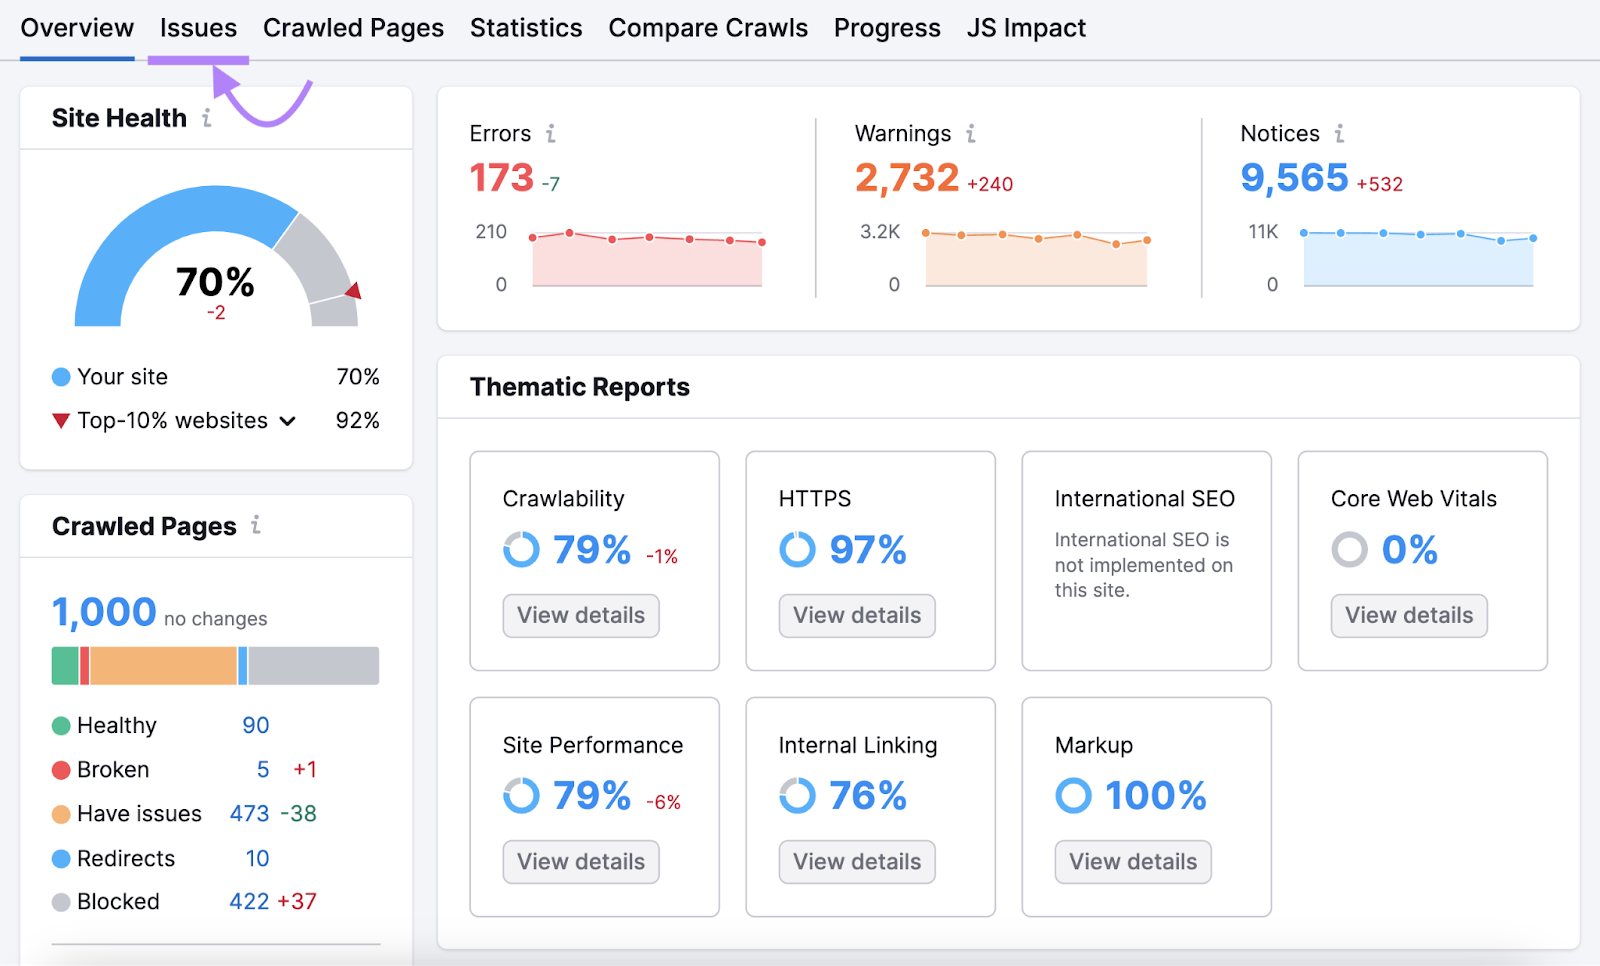
In the search bar, type in “h1.”
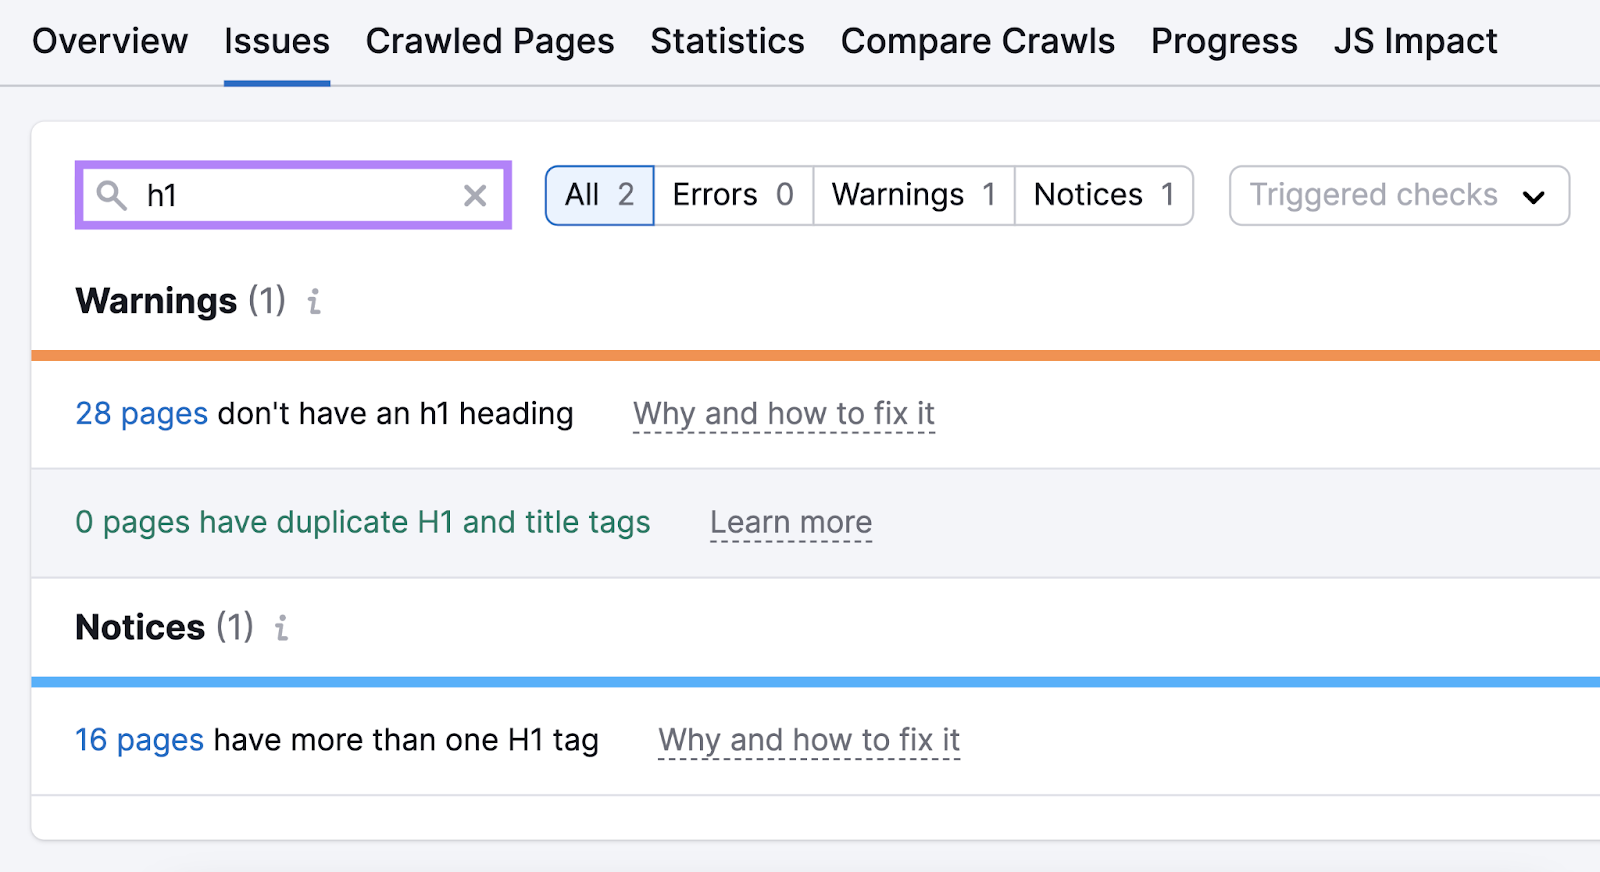
Now, you can see all pages that have H1 issues. Fix warnings first, then notices.
We recommend running regular audits to notify you of any new issues that need your attention.
To do this, set up a recurring report.
In the top right-hand corner of your Site Audit dashboard, click the gear icon.
Find “Schedule” by scrolling down through the settings.
Like this:
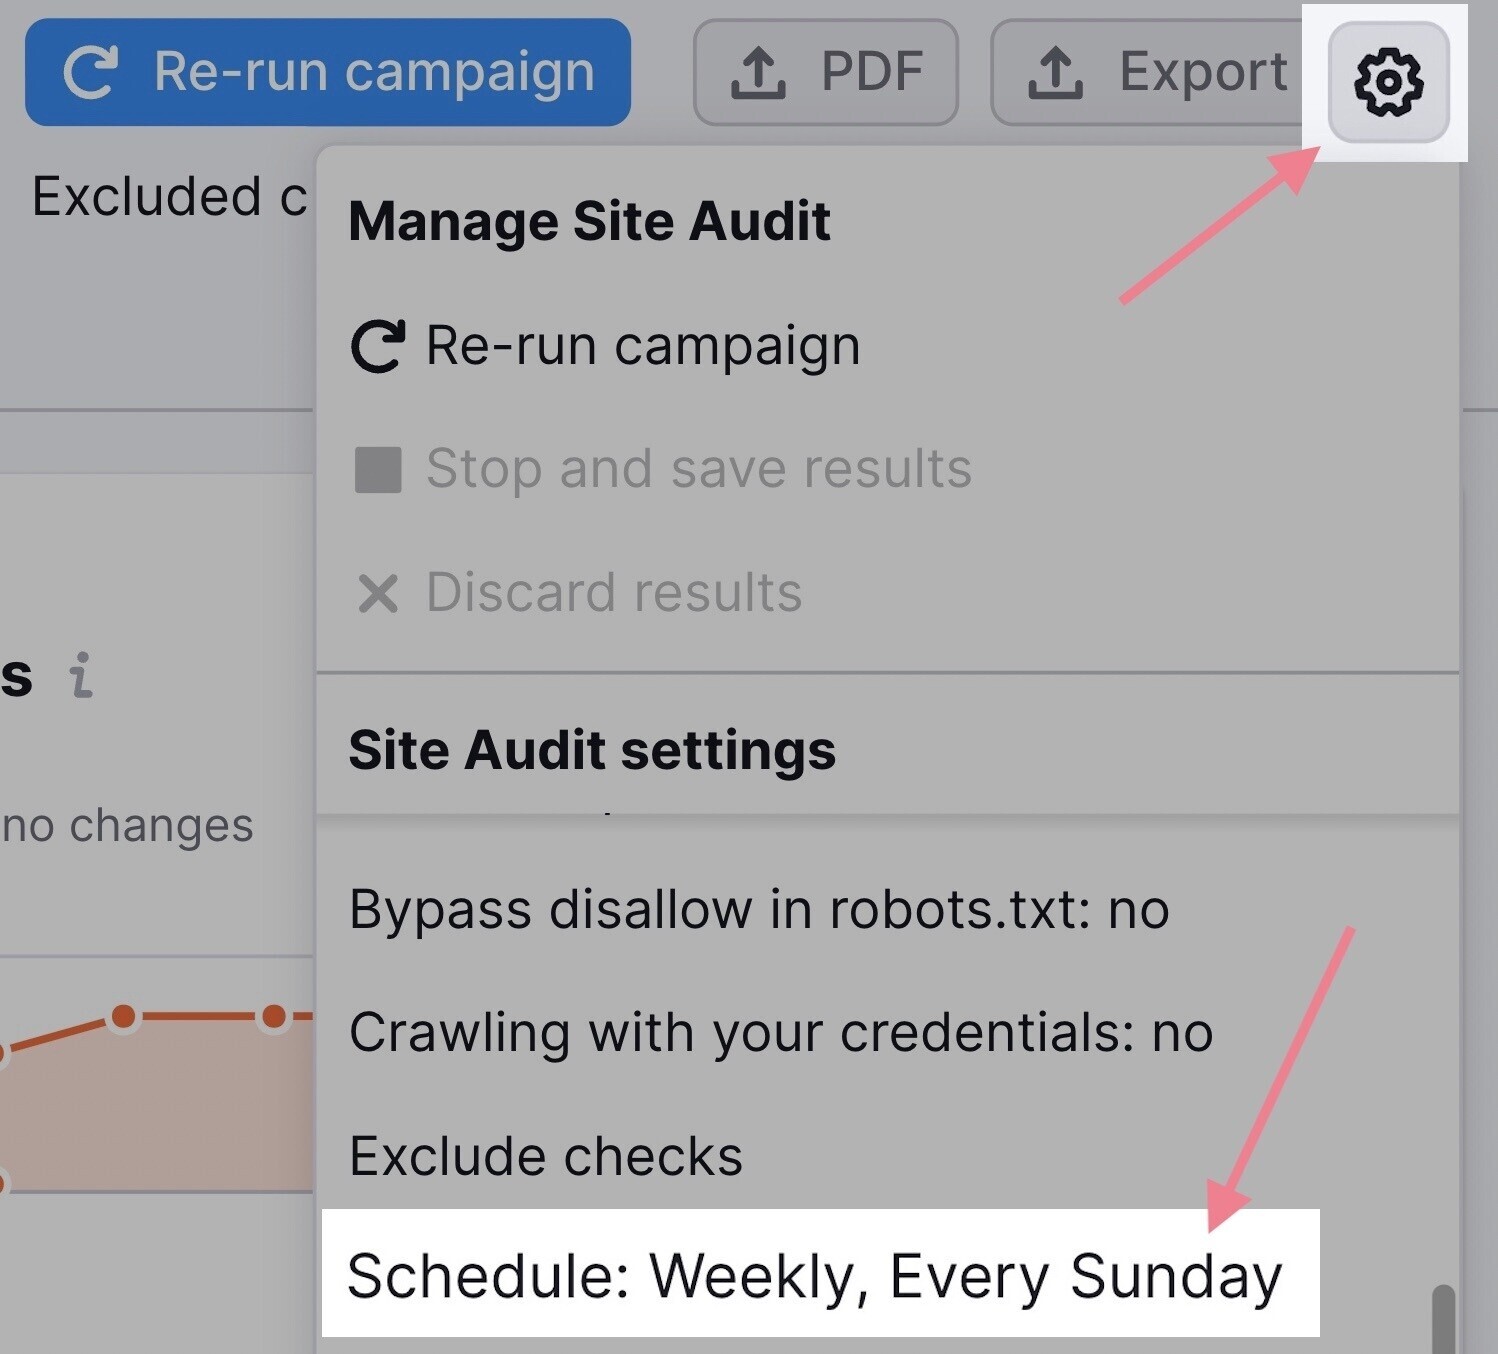
Next, you’ll see a pop-up where you can choose how often to run your report.
Set it to your preferred day. And make sure to click on the “Send an email” option at the bottom of the pop-up. Then, click “Save.”

That way, you’ll be able to fix any issues and keep your SEO efforts running smoothly.
